
If you’ve come across this post through a web search, it’s likely that you’ve attempted upgrading the Linksys Cisco WRT400N router with an alternate firmware like DD-WRT, only to find it unresponsive. Having dealt with this problem more than once, and finding the instructions on forums not very straightforward (and at risk of loss or deletion), I’ve assembled this guide on how to unbrick the WRT400N.
Things You’ll Need
- A Windows PC with an Ethernet port (or a USB Ethernet adapter)
- PL2303HX USB Serial Cable (under $10 on Amazon)
- Soldering iron and kit (and basic soldering skills)
- Torx drivers
- USB Serial Cable driver from http://www.prolific.com.tw/US/ShowProduct.aspx?p_id=225&pcid=41
- Putty standalone executable from https://www.chiark.greenend.org.uk/~sgtatham/putty/latest.html
- tftpd program from http://tftpd32.jounin.net/
- wrt400n-unbrick.bin (alternatively, search the web for ‘openwrt-to-dd-wrt.bin’ for the WRT400N – it’s the same file, I just renamed it)
I used a Windows 7 64-bit desktop PC for the flash. Note that because you’ll need to connect to the computer to the bricked WRT400N by Ethernet cable, the computer won’t have internet access during that time, so you’ll want to either load this page (and save all downloads) beforehand, or use a second device.
The Steps
- Open the WRT400N. There are 4 Torx screws total. You need to remove a warning sticker to access the 4th one.
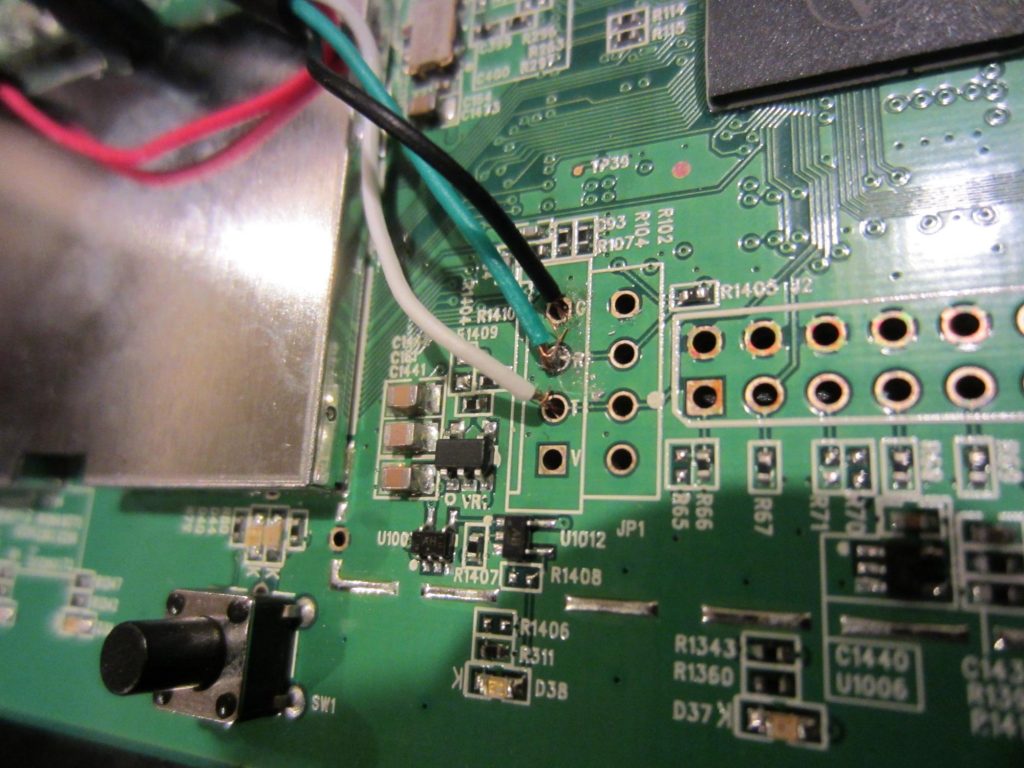
- Find the holes in the circuit board as shown in the photo below. On the PL2303HX USB Serial Cable, the black wire is ground (G), green is transmit (TX), white is receive (RX). Red is 5V and is not used. Using the image as a guide:
- Solder the black wire to G (ground) on the board.
- Solder the green wire (TX) to R (RX) on the board.
- Solder the white wire (RX) to T (TX) on the board.
- If you don’t know how to solder, find an instructional video online and follow all safety precautions.
- On the Windows PC, install the driver for the PL2303HX, then plug in the PL2303HX. Note the COM port (look in Device Manager if you don’t see what COM port it is when it installs). On my system it loaded on COM3.
- Run Putty. Under Connection, Serial, select the COM port (e.g. COM3). Make sure speed (baud) is ‘115200’, data bits is set to ‘8’, stop bits set to ‘1’, parity ‘none’, flow control ‘none’. You can save this session for future use.
- Open the connection in Putty. A black terminal window should open.
- Keeping your hands and any metal objects away from the exposed circuit board, plug in the power cable for the router. If you’ve done everything right, you should see text of the boot-up process scroll by in the terminal window. (If you don’t see this, you probably have a bad connection and need to resolder one of the wires.)
- Hit Ctrl-C to stop the autoboot process (you should see a prompt for this).
- This should get you to a prompt that reads “ar7100>”
- Run tftpd.exe. Browse to the folder on your PC containing the wrt400n-unbrick.bin firmware file.
- Edit your Ethernet connection in Windows. In Windows 7, go to Control Panel, Network and Internet, Network Connections. You should see your Ethernet (probably called Local Area Connection). Right-click, go to Properties, double click Internet Protocol Version 4 (TCP/IPv4). Change the selection to “Use the following IP address”:
- IP address: 192.168.1.88
- Subnet Mask: 255.255.255.0
- Default Gateway: 192.168.1.1
- Click OK.
- Disconnect from the internet, then connect the Ethernet cable from the computer to the router. (I think any LAN port will work, but if not, try the WAN port).
- Disable your firewall (Control Panel, System and Security, Firewall) and your anti-virus.
- Attempt to flash. In Putty, type (or copy/paste without the quotes) “tftpboot 0x80010000 wrt400n-unbrick.bin”
- If the flash works it should happen in just a few seconds – no more than 20.
- If successful, type (without the quotes) “erase 0xbf040000 +0x600000”
- Next type “cp.b 0x80010000 0xbf040000 0x600000”
- Finally, type “reset” to reboot the router and you should see it go through the boot process, the LEDs indicating a LAN connection and so forth.
- Open 192.168.1.1 in a browser and you should get a DD-WRT login page.
- You can now re-enable your firewall and anti-virus, and edit the properties of your LAN connection in Windows back to “Obtain and IP address automatically”.
I suggest leaving the PL2303HX soldered in place while you upgrade to newer versions of DD-WRT in case one of the upgrades bricks it again. I recommend upgrading to at least DD-WRT version 10-20-2017-r33555, as that release has the patch for the KRACK Wi-Fi vulnerability.
I was able to upgrade to version 08-30-2018-r36808 without problem at the time of writing this. Obviously you may want to try flashing something even newer. Once you’re sure the flash has been successful, you can unplug everything, desolder the wires from the WRT400N board, and put it back together.
If you successfully upgrade to a newer version of DD-WRT, please comment with the version number below so that others will know it’s safe. Likewise if you discover a version that bricks the router.
Great instructions! I’d recommend using soldering pins; a set of 3 fits perfectly. Also, a FTDI232 serial-USB module. Was able to flash v3.0-r44406 std (09/18/20), which seems to be good for many devices.